Instructions for FFmpeg Scripts
Table of contents
- Bash and Powershell
- General Usage (and -h for help)
- Preview (-p) or Save (-s)
- Optional Parameters
- audioviz
- bitplane
- bitplaneslices
- blend
- chromakey
- colorizer
- corruptor
- echo
- gif
- jetcolor
- lagfun
- life
- lumakey
- procamp
- proreser
- pseudocolor
- rainbow-trail
- repeat
- reverse
- rotate
- tblend_glitch
- tblend
- text
- tile
- trim
- xstack
- zoomflipscroller
Bash and Powershell
We have created Bash versions (for Mac and Linux users) and Powershell versions (for Windows users) of all scripts. We tried to make these versions act as similarly as possible , but you will notice some slight differences. For example, Bash scripts end with .sh and Powershell scripts end with .ps1. If the presenter is using a Mac and you’re using a PC, when they type script.sh, you should type script.ps1.
The scripts also print different information as output. If you see different help notes, error messages, or FFmpeg output than the presenter, that’s ok.
General Usage (and -h for help)
Nearly all of the scripts offer users two main paths: previewing the manipulated video with FFplay or saving directly to a file with FFmpeg. Due to the taxing nature of some of these visualizations, your computer may not be able to preview with FFplay in a completely seamless fashion (prepare for the possibility of laggy playback).
But fear not: you should be able to at least get a sense of how your art will look, and these delays will not carry over into your resulting files.
All scripts also come equipped with built-in help instructions, which can be pulled up with a -h flag.
For example, running the following:
./bitplane.sh -h
Will spit out these helpful hints:
Usage
 bitplane.sh [OPTIONS] INPUT_FILE Y_BITPLANE U_BITPLANE V_BITPLANE
Options
 -h  display this help
 -p  previews in FFplay
 -s  saves to file with FFmpeg

Notes

Outcome
 Manipulate Y, U, and V bitplanes to make colorful creations
 dependencies: ffmpeg 4.3 or later
Preview (-p) or Save (-s)
One of the operating assumptions of FFmpeg Art School is that you’ll want to try out a whole range of possibilities before settling on the look of your final artwork. To help you in this process, you can preview by using the -p flag. For example:
./lagfun.sh -p ./video_files/retrodancers.mov
If you’re satisfied with the echoey look of these Retro Dancers, you can re-run the previous command and simply swap the -p for -s to call FFmpeg and tell it to create and save the file.
Note: for Powershell script users, the -p flag first encodes the video to a temporary file and then plays the file with ffplay, so you will not see immediate feedback.
Note: when “saving” files, the resulting file will be placed in the same directory as the file you’re manipulating, with a helpful filename suffix that should call your attention. In the above case, the resulting file would be called retrodancers_lagfun.mov and it would live in the same video_files directory as the original.
For consistency and ease-of-use, all of the FFmpeg Art School scripts currently transcode input files to Prores HQ 422, wrapped in Quicktime (.mov). But feel free to adapt these to your wants or needs!
MOST IMPORTANT: the -p or -s flags are required, so if you run the scripts without them, nothing will happen!
Optional Parameters
Many—but not all—of the scripts allow for customization through the use of optional parameters (or positional arguments) passed by the user when executing a script. In almost all cases, we’ve written code that either defaults to pre-set options or makes random selections, but these variables can always be adjusted by the user as needed. And, most importantly, whether options are available for a script or not, they will be described in depth in the help documentation (run the script with a -h flag).
To take one example, the bitplane script, which manipulates the Y, U, and V planes of a video to make colorful creations, defaults to randomly chosen numbers between -1 and 10 for all three variables. But, if after running the script a number of times in preview mode, you’re happy with the look of a particular combination, you can re-run the script in the following way to hard set those numbers:
./bitplane.sh -p ./video_files/retrodancers.mov 3 4 1
audioviz
Creates an audio visualization overlay by blending two input files (one video, one audio) and using FFmpeg’s displace and showcqt filters. Essentially, the audio file gets passed through a frequency spectrum generating filter (showcqt) and the video file is forced to conform to the undulating waves of the audio. Sounds crazy, looks like this (Color Bars + Jumpin’ Jack Flash):
Usage:
./audioviz.sh -p ./audio_files/jumpin.wav ./video_files/colorbars.mov
Input 1: the audio file
Input 2: the video file
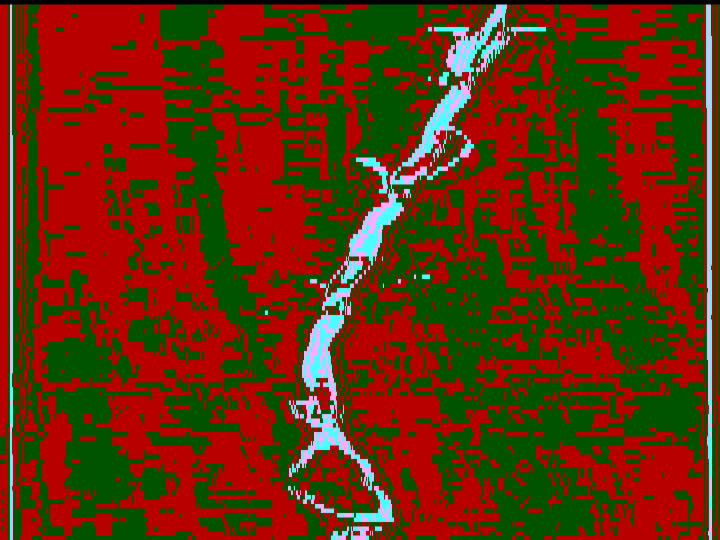
bitplane
Based on the QCTools bitplane visualization, which “binds” the bit position of the Y, U, and V planes of a video file by using FFmpeg’s lutyuv filter. The script has randomness built into it, and the numerical values—a range between -1 and 10—for the Y, U, and V planes will vary upon successive runs, yielding cool and different results each time you give it a spin. NOTE: -1 will be the equivalent of removing a plane entirely, while 0 is essentially a stand-in for not manipulating a channel at all (so three zeroes will look exactly like the video would without any change at all).
In YUV video, there are two things to keep in mind:
- Generally, the most significant bits are the lower value numbers—aka most of the image data lives in these lower bits—and as you go up the ranks to 10, your results will become noisier (harder to discern the source).
- In color difference video, Y equates to luma, or brightness, or black and white information; U to R-Y; and V to B-Y, so adjusting Y numbers will make the most dramatic difference, while adjusting U and V will make the most colorful difference.
Some additional helpful info from the QCTools documentation:
For the Y plane a pixel will display as black if that bit is ‘0’ or white if that bit is ‘1’.
For U a pixel will be yellow-green if ‘0’ purple if ‘1’.
For V a pixel will be green for ‘0’ and red for ‘1’.
Generally lossy video codecs will show blocky structured patterns at higher numbered bit positions.
Usage:
./bitplane.sh -p ./video_files/fonda.mov 1 6 -1
Input 1: the video file
Input 2 (optional, random if unspecified): the Y channel (-1-10)
Input 3 (optional, random if unspecified): the U channel (-1-10)
Input 4 (optional, random if unspecified): the V channel (-1-10)
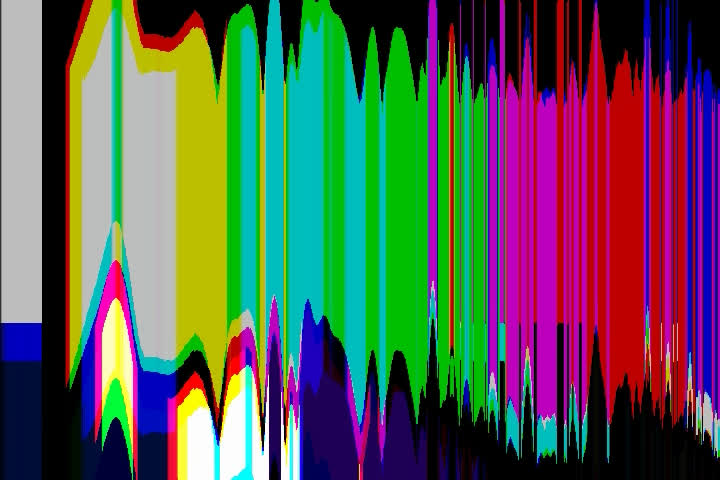
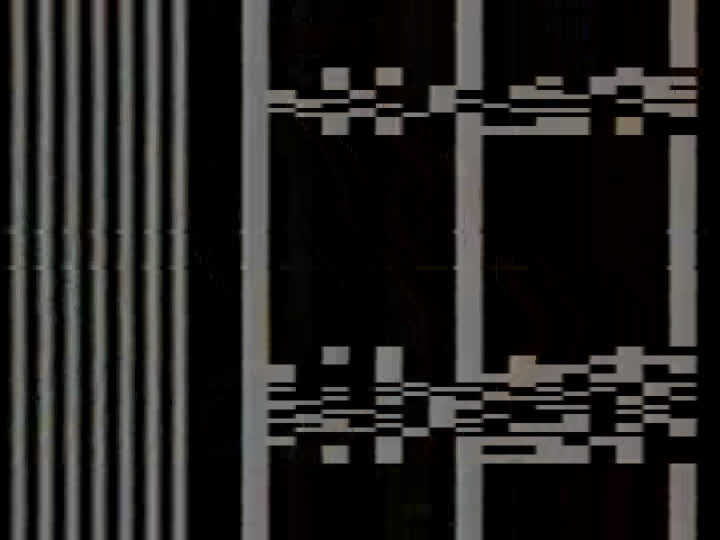
bitplaneslices
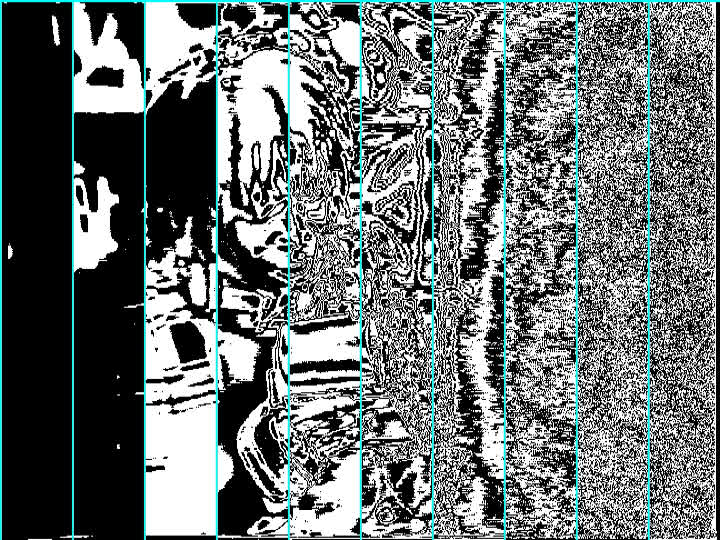
Totally lifted from QCTools, this script manipulates ONLY the Y plane of a video file (with FFmpeg’s lutyuv filter) to create a “sliced” effect in which cropped sections of the source video are presented in numerical order from most significant bit (1) to least (10). Hard to describe, looks like this:
Original video
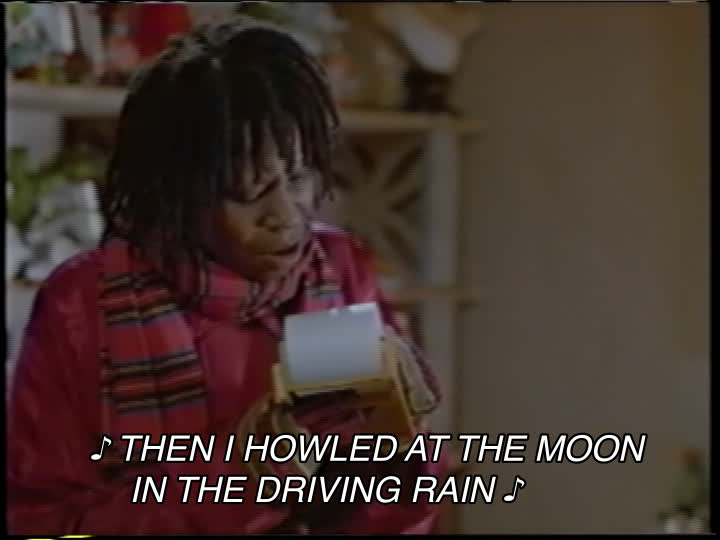
Passed through bitplaneslices
Usage:
./bitplaneslices.sh -p ./video_files/jumpinjackflash.mov
Input 1: the video file
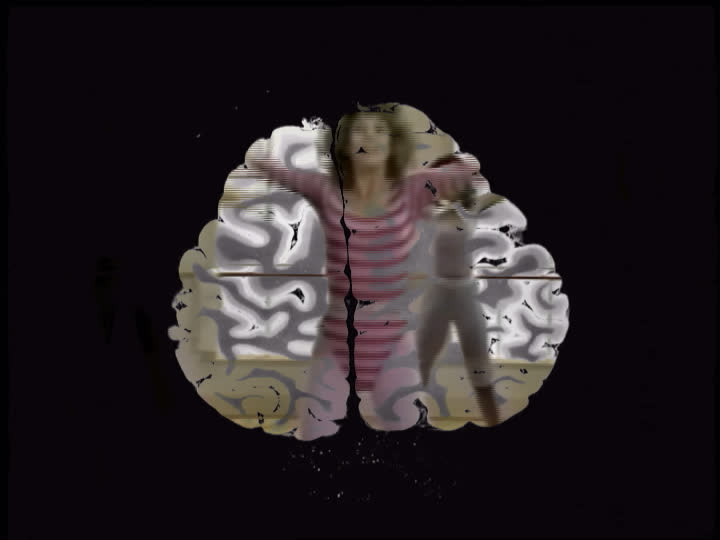
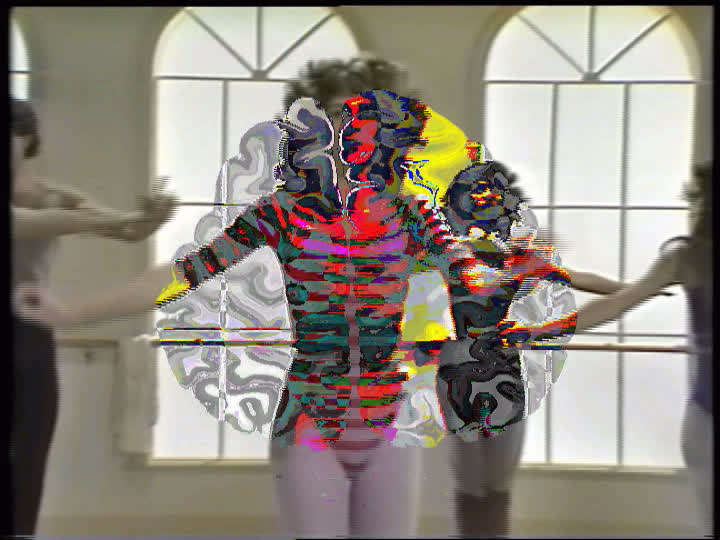
blend
Blends two files together in a variety of ways, using FFmpeg’s blend filter. The first input will serve as the “top” layer, the second the “bottom.” Defaults to addition128, but a number of other options are available (don’t miss out on xor!):
addition, addition128, grainmerge, and, average, burn, darken, difference, difference128,
grainextract, divide, dodge, freeze, exclusion, extremity, glow, hardlight, hardmix, heat,
lighten, linearlight, multiply, multiply128, negation, normal, or, overlay,
phoenix, pinlight, reflect, screen, softlight, subtract, vividlight, xor
Usage:
./blend.sh -p ./video_files/brain.mov ./video_files/fonda.mov pinlight
Input 1: the first video file (top layer)
Input 2: the second video file (bottom layer)
Input 3 (optional): the blend mode
MRI brain scan + Jane Fonda’s Workout (pinlight)
MRI brain scan + Jane Fonda’s Workout (xor)
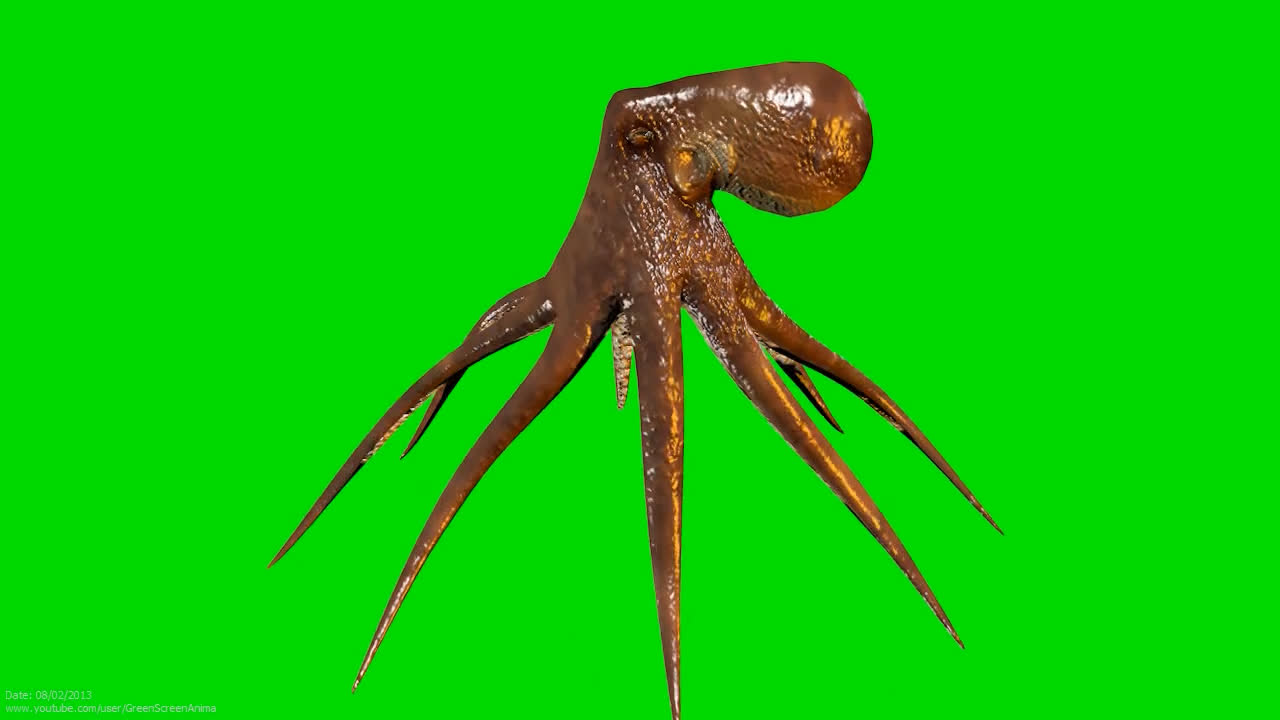
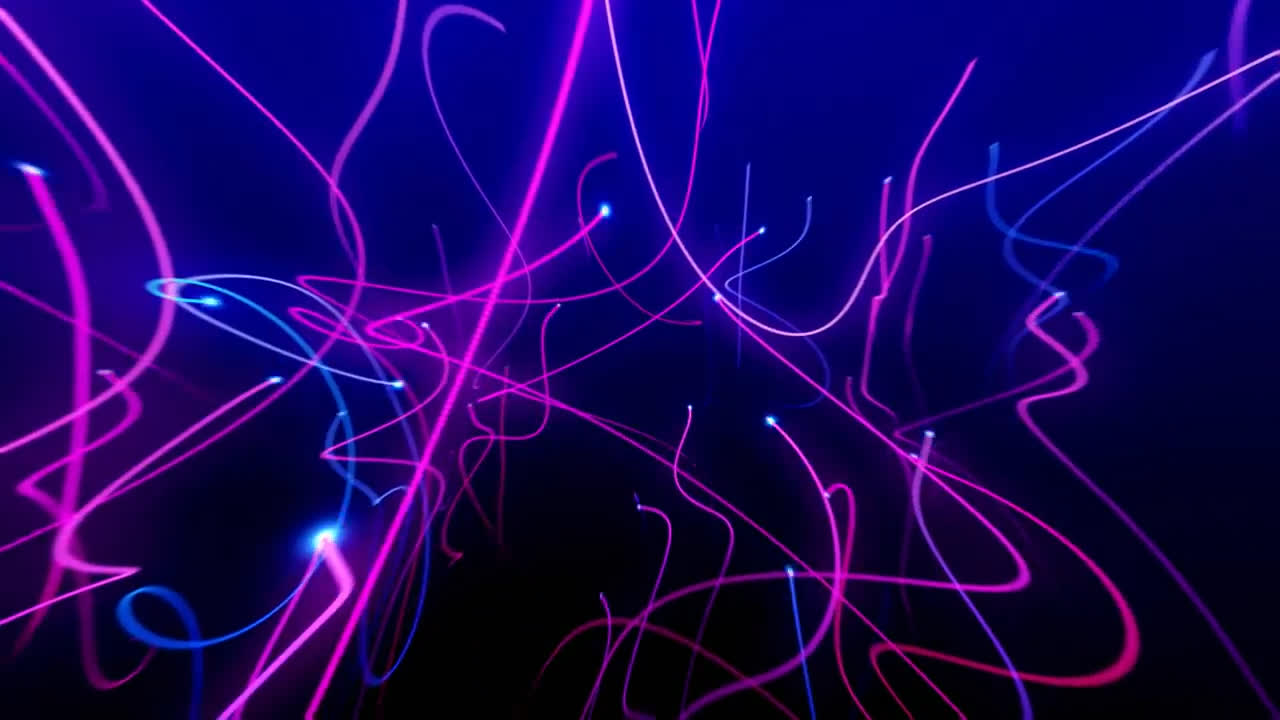
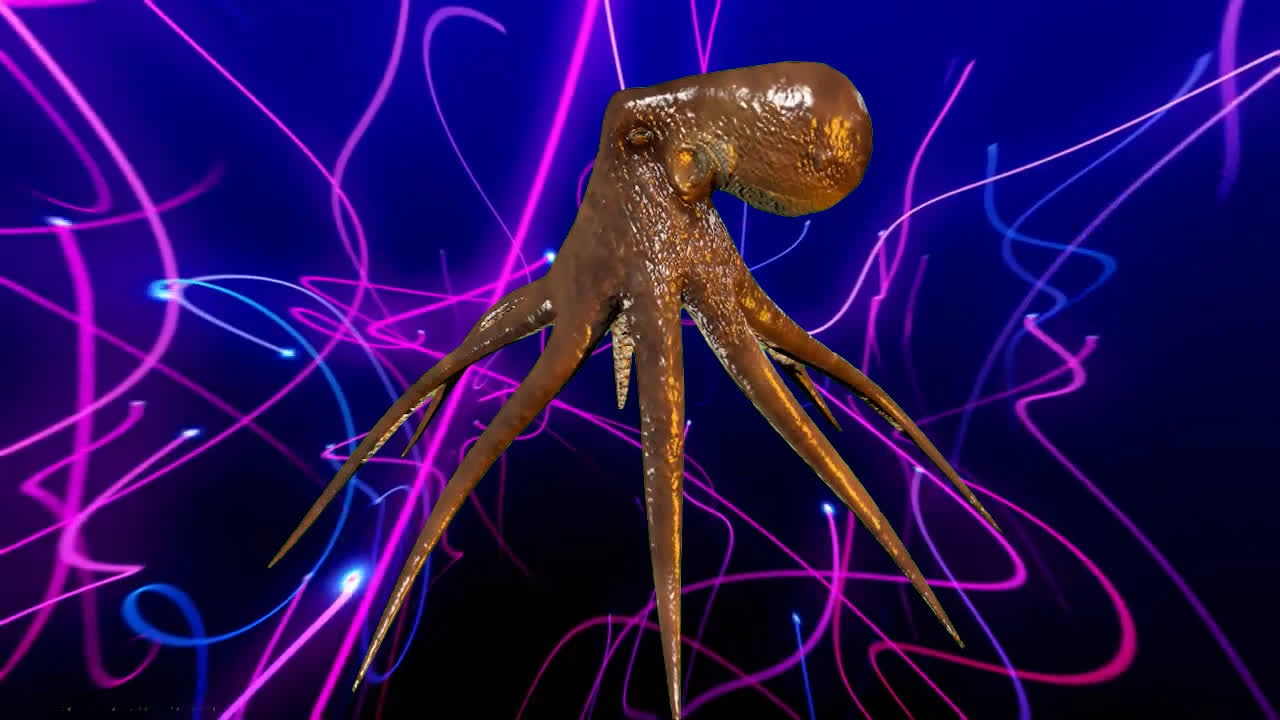
chromakey
Combines two files using chromakey effects, using FFmpeg’s chromakey filter. Fairly straightforward, but you do have to have at least one file that contains the “green” screen that will be replaced with transparency.
Usage:
./chromakey.sh -p ./video_files/green_octopus.mov ./video_files/neonsquigglelines.mov
Input 1: the video file that contains the “green screen” or color to be keyed out
Input 2: the video file that will appear behind the keyed video
Input 3 (optional): the color to be keyed. Any hex color code can be entered, as well as the following colors: green, blue, red, purple, orange, and yellow. The default value is green or 00FF00.
Input 4 (optional): the similarity level. Default value is 0.6 The closer to 1 the more will be keyed out.
Input 5 (optional): the blending level. Default value is 0.1
Green Screen Octopus
Background video (neon squiggle lines)
Chromakeyed video
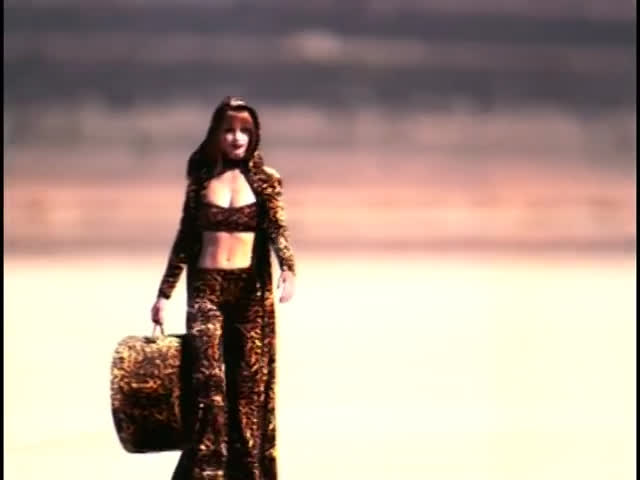
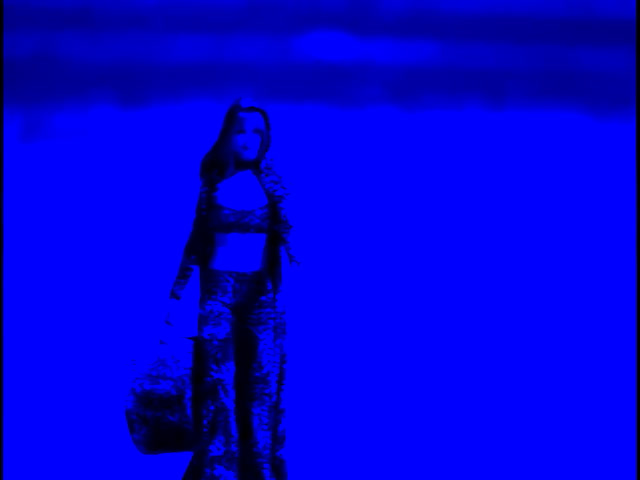
colorizer
Re-mixes a video’s color channels using FFmpeg’s colorchannelmixer filter.
Usage:
./colorizer.sh -p ./video_files/shania.mov red
Input 1: the video to be colorized
Input 2: the color (red, orange, yellow, green, blue, purple, white or black)
Shania Twain “That Don’t Impress Me Much” music video
Mixed red
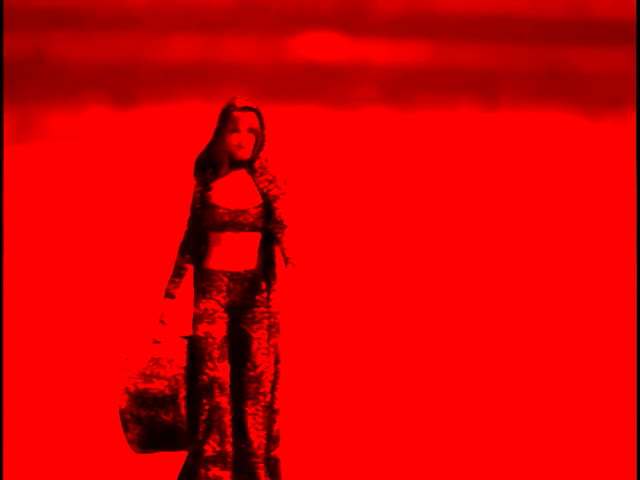
Mixed blue
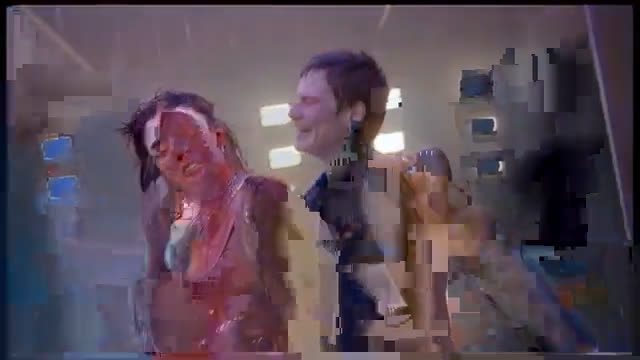
corruptor
Uses FFmpeg’s bitstream noise filter to CORRUPT your video in potentially cool looking ways. Mostly used for fuzzing or error concealment/resilience testing, but adapted here to suit our artistic needs.
Usage:
./corruptor.sh -p ./video_files/charli.mov
Input 1: the video to be corrupted
Input 2 (optional): the corruption Amount [default: 0.1]. 0 is no error and 1 is all error. Anything above 0.5 will likely not play
Input 3 (optional): keep temporary file (boolean). Default is 0 (false), use 1 to keep the file but it will probably be wonky
Charli XCX & Christine and the Queens “Gone” music video
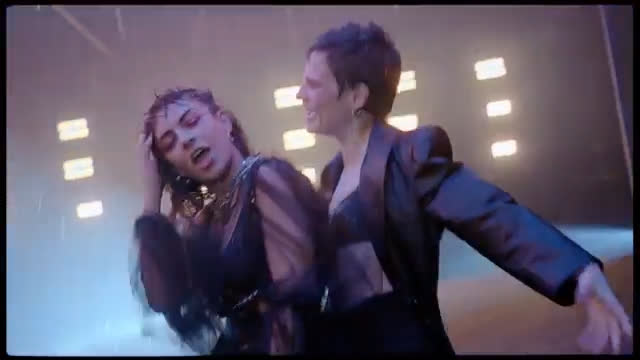
Corrupted (with default settings)
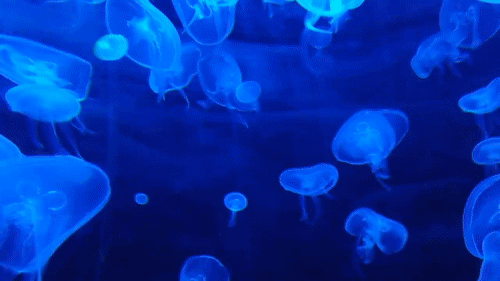
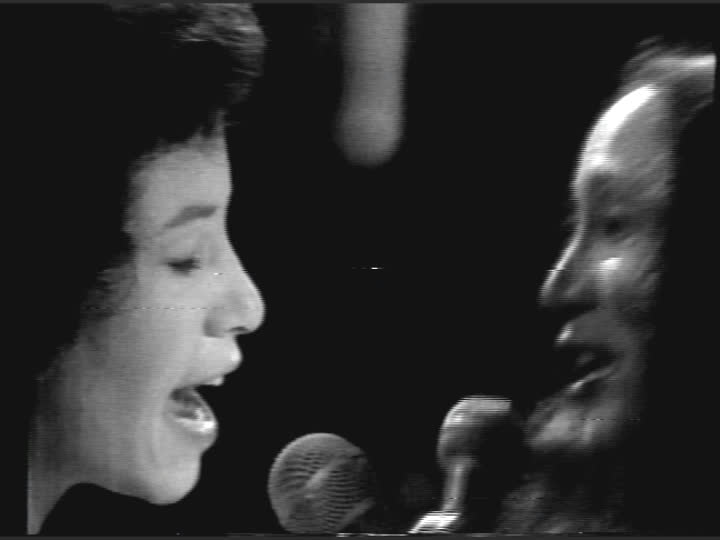
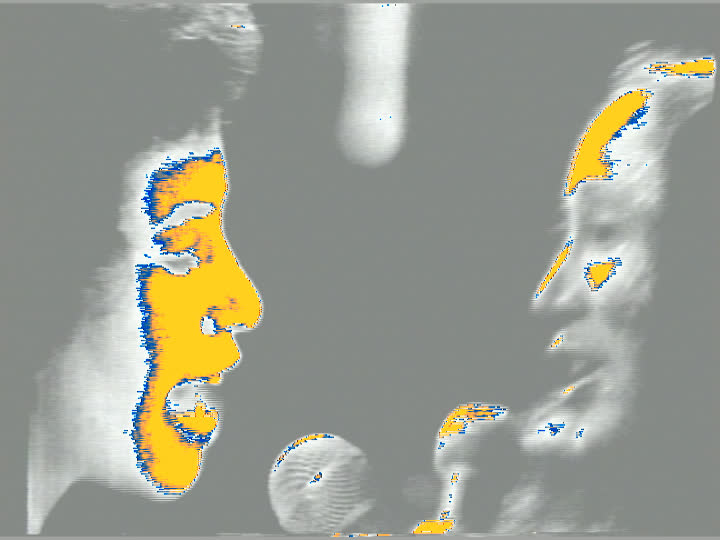
echo
Uses FFmpeg’s blend filter to create a video echo/ghost/trailing effect. Offers eight different blend modes, with varying effects:
# 1: Normal mode, nice and balanced with evenly blending trails, but gets out of hand with a higher tail length.
# 2: Screen mode, Works well with high contrast stuff but gets out of hand very quickly
# 3: Phoenix mode, cool psychedelic effect
# 4: Softlight mode, trails dissipate very quickly, a subtle effect.
# 5: Average mode, Similar to normal with slightly different colors.
# 6: Heat mode, image is harshly affects.
# 7: Xor mode, very cool strobing effect
# 8: Difference mode, slightly less intense than xor but similar
Usage:
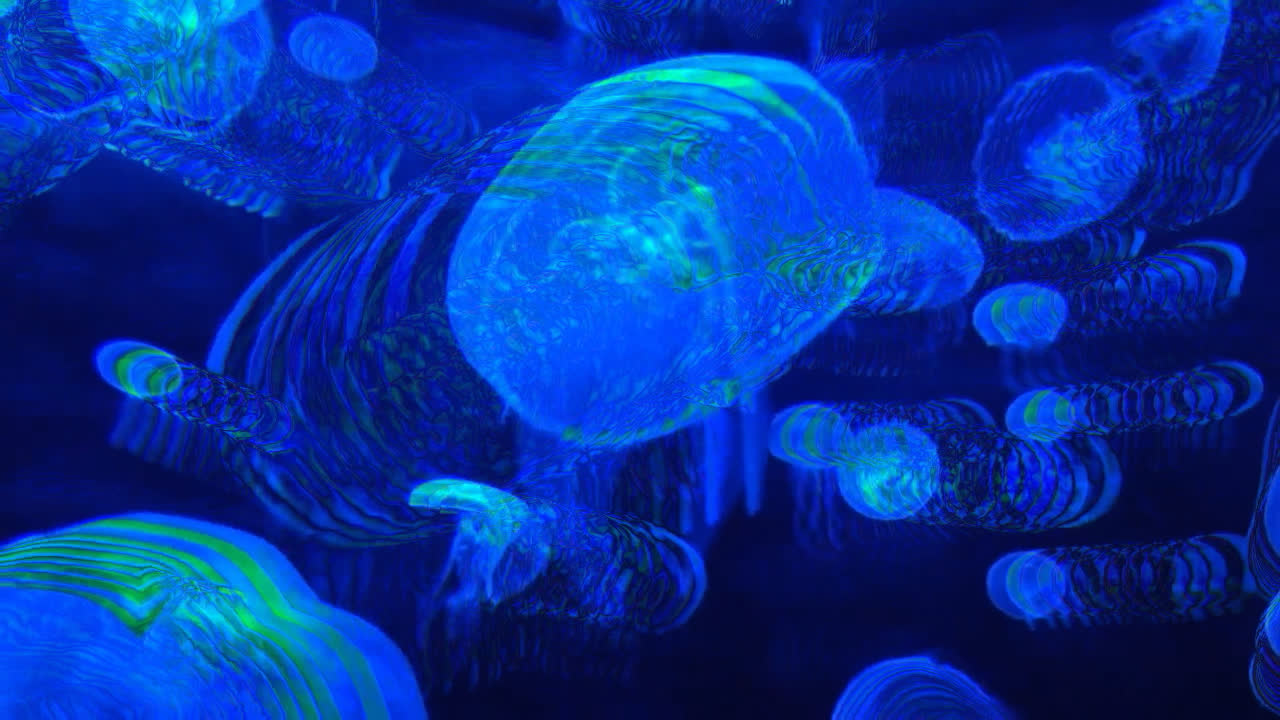
./echo.sh -p ./video_files/jellyfish.mov .2 5 3
Input 1: the video file to be echoed
Input 2 (optional): the echo rate, in seconds (default is 0.2)
Input 3 (optional): the length of trails. 1 is just one trails, number increases exponentially as it goes.
Input 4 (optional): the echo mode (choose 1 thru 8)
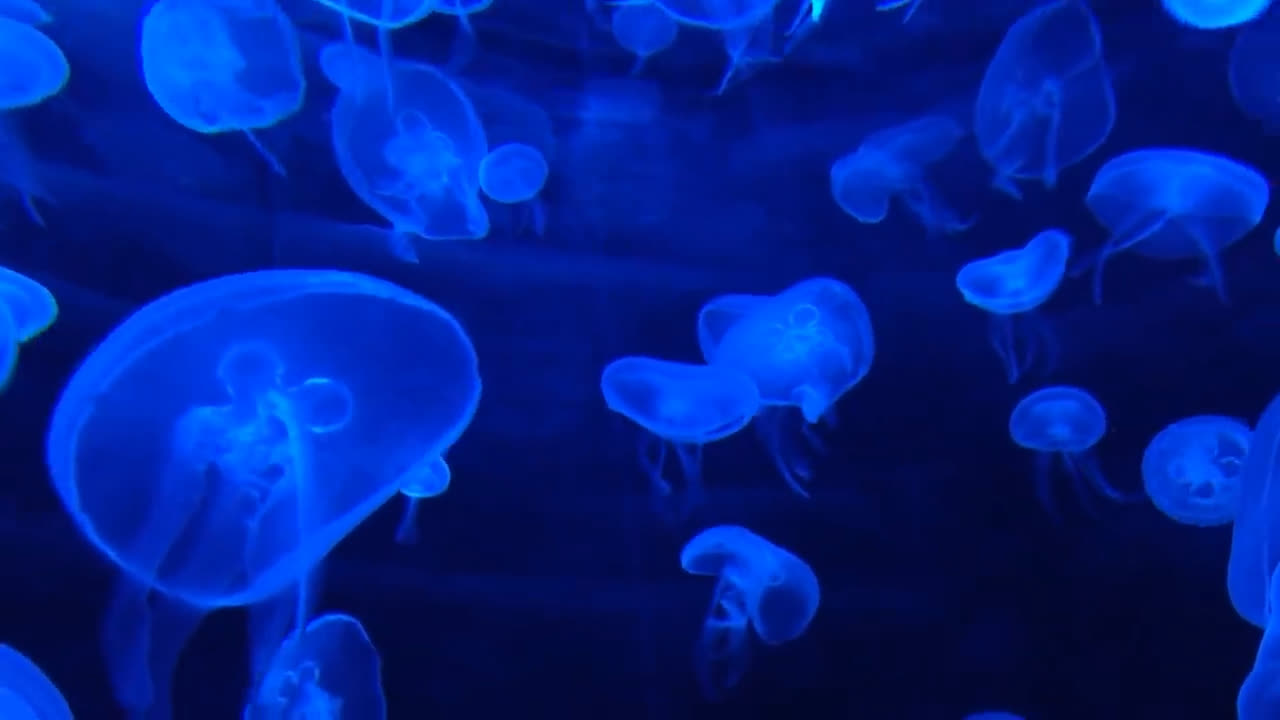
Jellyfish
Echo Jellies
gif
Turns a video file into a gif, using FFmpeg’s palettegen filter (good for sharing your art!). Note: this script has no preview mode, it just makes gifs.
Usage:
./gif.sh ./video_files/jellyfish_echo.mov 1
Input 1: the video file
Input 2: the quality of the resulting gif (0 = more compressed, smaller file; 1 = less compressed bigger file)
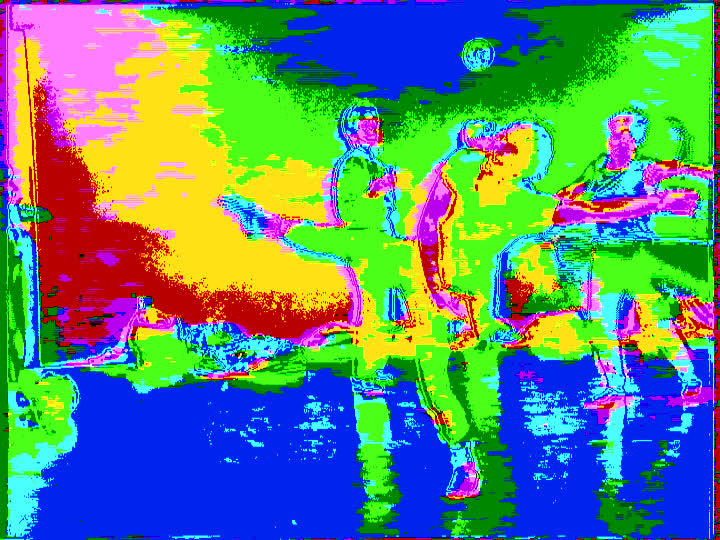
jetcolor
Uses FFmpeg’s pseudocolor filter to create a “jetcolor” effect (also boosts the brightness and saturation of the video before the jet takes off).
Usage:
./jetcolor.sh -p ./video_files/dancers.mov
Input 1: the video to be jetcolored
Input 2 (optional): toggle between three different jetcolor modes (1-3, default 1)
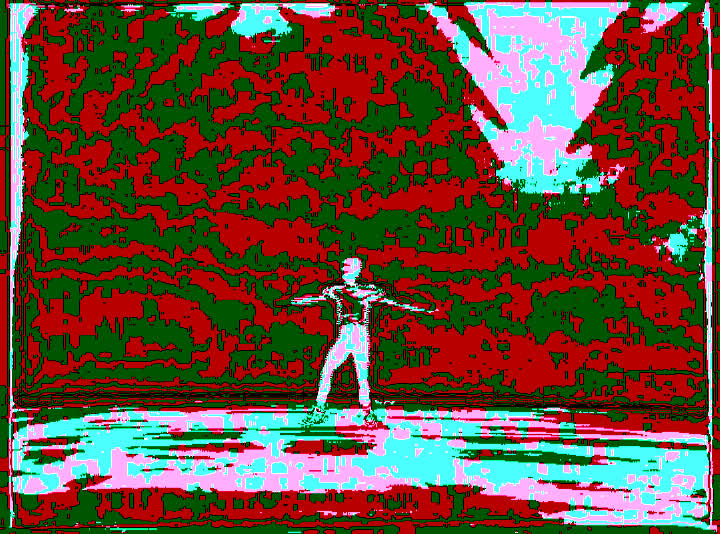
Original video of dancer
Jetcolor Dancers, mode 1
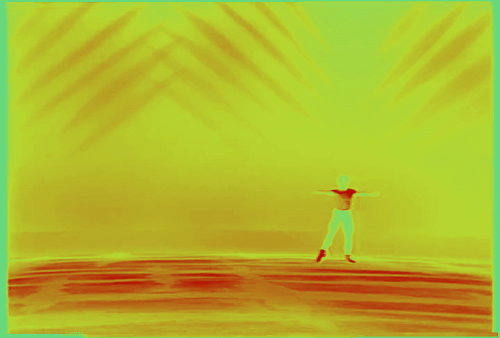
Jetcolor Dancers, mode 3
lagfun
Creates a different kind of echo/ghost/trailing effect, using FFmpeg’s lagfun filter.
Usage:
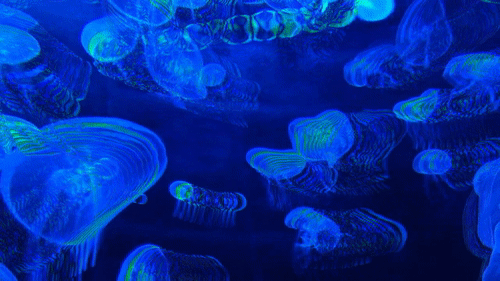
./lagfun -p ./video_files/jellyfish.mov 3
Input 1: the video file to be lagged
Input 2: the trail mode (pick 1 thru 3). Try different modes for fun!
Input 3: the trail amount, or intensity of the effect. Default is 1.
Lagfun Jellies, trail mode 3
life
One of the only Art School scripts to not require an input file, this one uses FFmpeg’s life filter to generate a visualization based upon John Conway’s Game of Life. Ideal for testing your FFmpeg installation and the starting point of FFmpeg Art School’s lesson plan. Note: if running this script in save mode, the resulting file will be located in your current working directory (in all likelihood bash_scripts or powershell_scripts)
Usage:
./life.sh -p
Input 1 (optional): the game size (small, medium, or large). Default is medium.
Input 2 (optional): the color of life (blue, green, red, purple, or orange). Default is yellow.
Input 3 (optional): the color of death (blue, green, red, purple, or orange). Default is red.
Input 4 (optional): the rate (slow, medium, or fast). Default is random selection.
Input 5 (optional): the ratio (low, medium, or high). Default is random selection.
Game of Life, also best seen in gif form
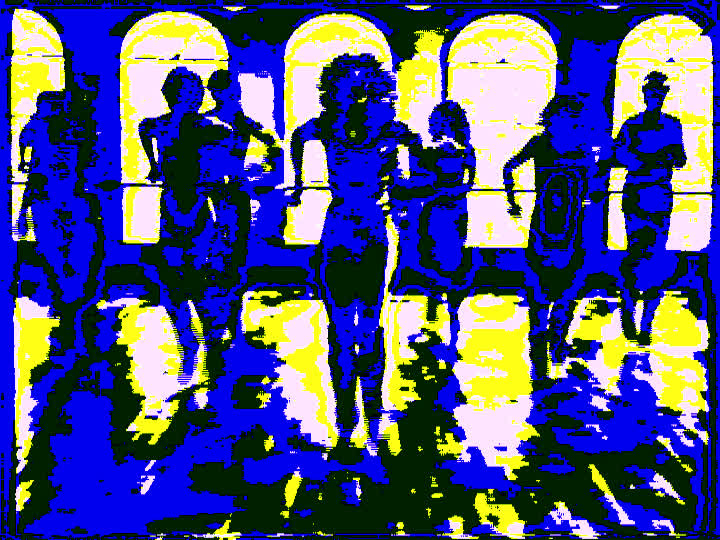
lumakey
Combines two files using FFmpeg’s lumakey filter, transforming certain luma values into transparency.
Usage:
./lumakey.sh ./video_files/green_trex.mov ./video_files/flowers.mov
Input 1: the video that will be keyed
Input 2: the background video
Input 3 (optional): the threshold (0 will key out black, 1 will key out white). Default is 0.
Input 4 (optional): the tolerance (if the threshold is 0, use a low number like 0.1 to key out darks. If threshold is 1, use a high number like 0.7 to key out whites). Default is 0.1.
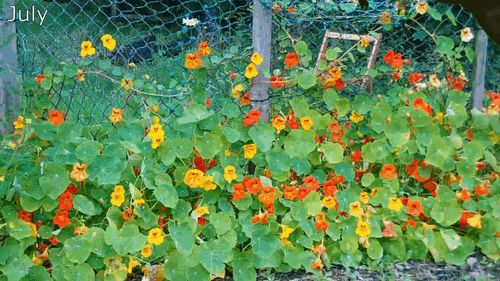
Input 5: the softness (softens the key; 0 has sharp edges, 1 is Downy soft, though it’s not advisable to go above 0.4). Default is 0.2.
Green screen T-Rex, lumakeyed over timelape video of Nasturtium flowers
procamp
A script that mimics a timebase corrector’s (TBC) processing amplification (procamp) controls, allowing for manipulation of the luma, black, chroma, or hue/phase of an input video. Modeled specifically on the DPS-290 TBC, each value has a range of -128 to 128, with 0 being the unchanged amount. Uses FFmpeg’s lutyuv and hue filters to make its manipulations.
Usage:
./procamp.sh -p ./video_files/neonlines.mov 0 0 0 65
Input 1: the video to be procamped
Input 2: adjusts the luma/contrast (-128 to 128, 0 = no change)
Input 3: adjusts the black/brightness (-128 to 128, 0 = no change)
Input 4: adjusts the chroma/saturation, or intensity of color (-128 to 128, 0 = no change)
Input 5: adjusts the hue/phase, or shade of color (-128 to 128, 0 = no change)
Neon Lines
Neon Lines w/ hue adjustment of 65

proreser
Conforms any input file into a prores file, with an option to resize. Not terribly exciting, but good for normalizing your files before making art.
Usage:
./proreser.sh -s ./video_files/neonlines.mov 640x480
Input 1: the video file to be transcoded to prores/mov
Input 2 (optional): the resolution of the output file, formatted as WxH (ex: 640x480)
pseudocolor
Boosts the video levels on an input file and adds a gradient effect to pixels that are out of broadcast range, using FFmpeg’s pseudocolor filter.
Usage:
./pseudocolor.sh -p ./video_files/nightturkey.mov
Input 1: the video file to be boosted and given gradient out-of-range colors
Night Turkey (BAVC EIAJ Test Tape from 1973)
Pseudocolored
rainbow-trail
Adapted from oioiiooixiii and the amazing work described in this blog post, this script generates a rainbow trail effect that’s loosely based on the Scanimate video synthesizer system. A real doozy, uses FFmpeg’s colorkey, chromakey, and colorchannelmixer filters.
Usage:
./rainbow-trail.sh -p ./video_files/jellyfish.mov
Input 1: the video to be rainbow trailed
Input 2 (optional): the colorkey value (default: 0000FF)
Input 3 (optional): the similarity value (default 0.3)
Input 4 (optional) the colorkey blend value (default 0.1)
Input 5 (optional): the number of color iterations (default: 7)
Input 6 (optional): alpha plane extraction (default: true)
Rainbow Jellies
repeat
Repeats the input file an arbitrary number of times. Makes a temporary concatenation list, uses FFmpeg’s concatenation demuxer to loop it up. NOTE: for this script, preview mode is disabled.
Usage:
./repeat.sh -p ./video_files/iknow.mov
Input 1: the video file to be repeated
Input 2 (optional): the number of times to repeat the file. Default 2.
I Know What You Did Last Summer, the “What are you waiting for” moment (looping gif, but also a looping video! Believe it!)
reverse
Reverses the input file using FFmpeg’s reverse filter.
Usage:
./reverse.sh -p ./video_files/dancers.mov
Input 1: the video file to be reversed
Original video
Reversed
rotate
Rotates an input file with options to resize the output, using FFmpeg’s transpose filter.
Usage:
./rotate.sh -p ./video_files/cat.mov 270 1
Input 1: the video file to be rotated
Input 2: the rotation amount, in degrees (must be 90, 180, or 270)
Input 3: the stretch, to conform an output file to the input’s aspect ratio (1 for true 0 for false)
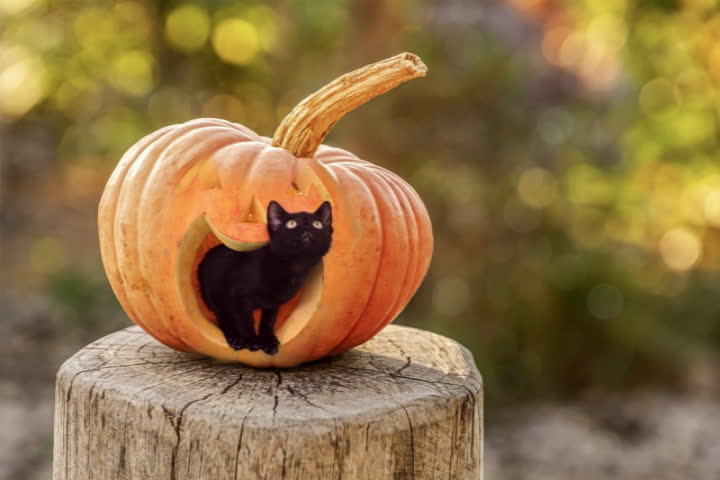
Cat + Pumpkin
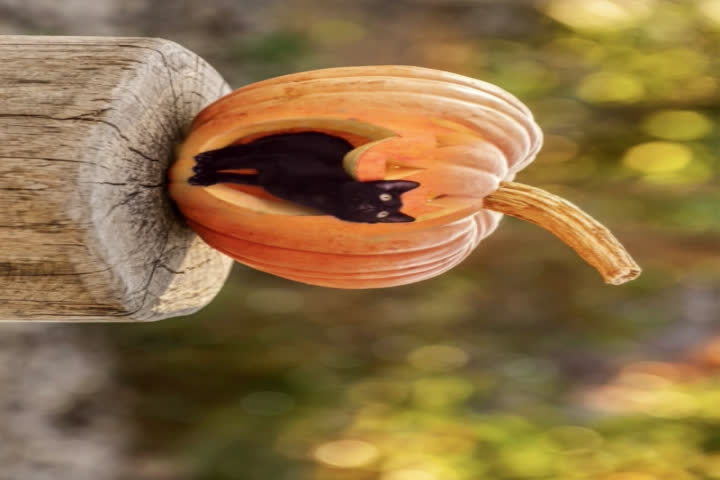
Rotated Cat + Pumpkin (270 degrees, aspect ratio manipulated)
tblend_glitch
Performs a glitchy tblend on an input video file, again adapted from oioiiooixiii
Usage:
./tblend_glitch.sh ./video_files/neonlines.mov 4
Input 1: the video file to be tblend glitched
Input 2: the blend mode (choose a number between 1 and 4)
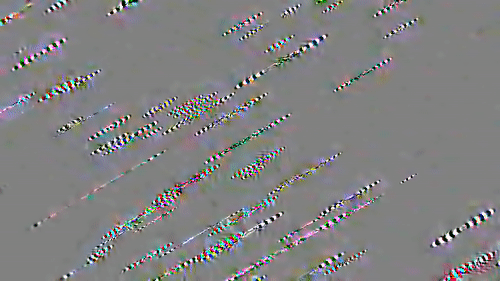
Neon lines, tblend glitched 1
tblend
Applies FFmpeg’s tblend filter with an arbitrary blend mode. Trippy trippy stuff.
Usage:
./tblend.sh -p ./video_files/flowers.mov xor
Input 1: the video file to be tblended
Input 2: the blend mode. Options include:
addition, addition128, grainmerge, and, average, burn, darken, difference, difference128, grainextract, divide, dodge, freeze, exclusion, extremity, glow, hardlight, hardmix, heat,
lighten, linearlight, multiply, multiply128, negation, normal, or, overlay,
phoenix, pinlight, reflect, screen, softlight, subtract, vividlight, xor
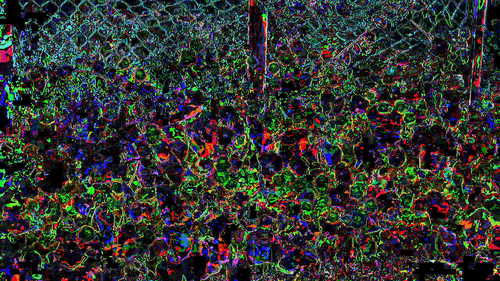
Nasturtium flowers timelape video, tblend xor
text
Generates text on screen based upon user input, offering a variety of text colors, background colors, sizes, and scroll directions/speeds. Uses FFmpeg’s Libavfilter virtual input device and the drawtext filter to do its thing.
Note: this script does not draw text on top of a input file, but rather generates something akin to a title card. So no input file needed!
Usage:
./text.sh -p "Hello World" white green 100 up
Input 1: the text to be written. Accepts either text in quotation marks or path to a text file. If text, no apostrophes. If text file. make sure it’s plain text.
Input 2: the color of the text (white, black, silver, grey, green, blue, yellow, red, purple, orange). Default: white
Input 3: the background color (white, black, silver, grey, green, blue, yellow, red, purple, orange). Default: black
Input 4: the text size (higher = bigger)
Input 5: the direction of the scroll (left, right, up, down, center). Default: center (no motion)
Input 6: the speed of the scroll (higher = faster)
“Hello World” white text (size 100) on green background, scrolling up

tile
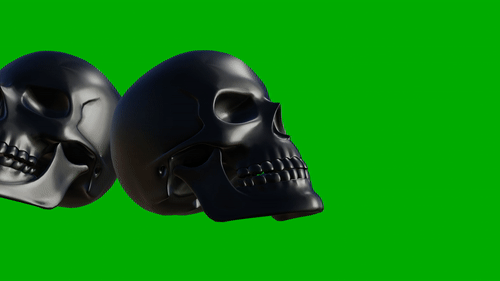
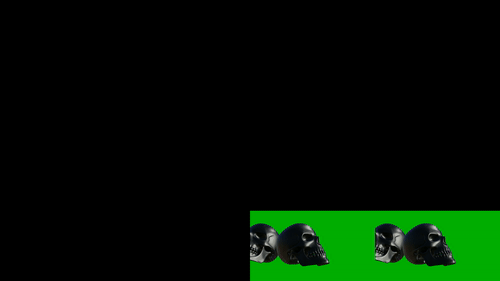
Adapted from the QCTools filmstrip filter. Uses the FFmpeg tile filter to create a mosaic, “tiled” effect for the input video, based upon a user selected set of rows and columns.
Usage:
./tile.sh -p ./video_files/skull.mov
Input 1: the video file to be tiled
Input 2 (optional): the number of columns (must be a multiple of 2). Default: 4
Input 3 (optional): the number of rows (must be a multiple of 2). Default: 4
Input 4 (optional): the output frame size. This will squeeze the output into a specific size. Must be in format “WIDTHxHEIGHT” to work
Green screen black skull
Tiled skulls
trim
Trims a video file based upon user-defined starting and ending timestamps (HH:MM:SS). Uses FFmpeg’s output seeking to make its cuts. NOTE: for this script, preview mode is disabled.
Usage:
./trim.sh -s ./video_files/skull.mov 00:00:00 00:00:10
Input 1: the video to be trimmed
Input 2: the start point (HH:MM:SS)
Input 2: the end point (HH:MM:SS)
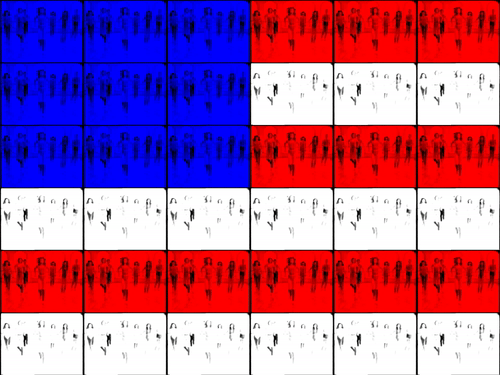
xstack
Creates a mosaic of multiple input video files using FFmpeg’s xstack filter. Note: though the xstack filter itself is endlessly customizable, this script will only accept a set number of input files that can be stacked into a square shape (4, 9, 16, or 25).
Usage:
./xstack.sh -p INPUT_FILE_1 INPUT_FILE_2 INPUT_FILE_3 INPUT_FILE_4
Input 1: the video file to be situated in the upper left corner
The following inputs will vary based upon the total number to be stacked (4, 9, 16, or 25), but inputs should be sequenced from left to right, from row to row, as desired.
25 colorized videos of Jane Fonda’s workout, arranged in American flag design (riff on Nam June Paik’s “Video Flag”)
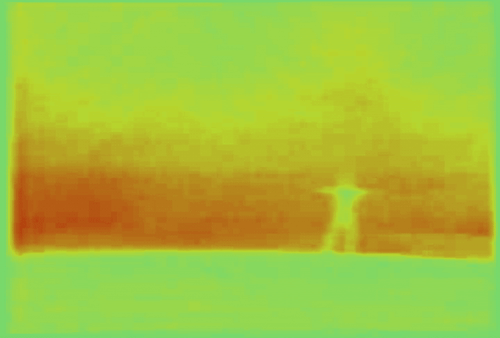
zoomflipscroller
A play on one of the visualizations provided by the Line 21 closed caption extraction tool sccyou, zoom/flip/scroller takes a single line of video, zooms in extra close, flips it on its axis, and scrolls up vertically. Designed to visualize and analyze closed captioning information, which lives at the tippy top of the video raster, this re-purposing—which draws upon FFmpeg’s crop, scale, and tile filters—generates results unlike any other. And, as with bitplane, zoomflipscroller defaults to a randomly selected line (between 1-350) but will also accept a user-specified input.
Usage:
./zoomflipscroller.sh -p ./video_files/jumpinjackflash.mov 1
Input 1: the video file to be zoomed/flipped/scrolled
Input 2 (optional): the line to be zeroed in on. Default: random number between 1-350. If your video has line 21 and you’d like to zoom in on it, select 1.
Jumpin’ Jack Flash, zoom in on line 21 (line 1)
More fun: random zoom on colorful and random bitplaned video
Bitplaned dancer (Y:3, U:-1, V: 7)
Zoom/Flip/Scroll, line 286